To configure MD Trader:
- Right-click anywhere in the MD Trader widget outside of the price ladder to open the context menu and select
Settings….
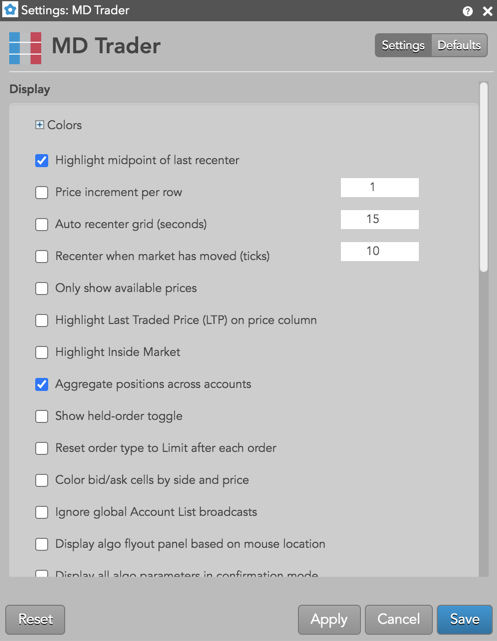
The Settings: MD Trader screen opens.
-
In the Settings: MD Trader screen, configure the following settings:
-
Click Apply and Save.
Note: To make an MD Trader widget’s settings the new defaults for subsequently opened MD Trader widgets, click Save as default before saving.
Setting context menu options
To set context menu options:
- Right-click the Order Entry Panel, Header Panel, or Column Headers in the MD Trader widget to open the context
menu.
For a description of each setting, refer to MD Trader Reference.
Adding custom action buttons
If you frequently use one or more order types, you can add buttons to an MD Trader widget that automatically set the order type or TIF in place of selecting it from the order type drop-down. You can add buttons for:
- Exchange order types
- TT order types
- User-defined Order Ticket Algos
- User-defined Synthetic Order Algos
- Time-in-Force (TIF)
For example, if you frequently submit Stop Limit orders and TT Time Sliced orders and use a Good-Til-Cancel TIF, you can add custom action buttons as shown below.

When you click a custom order type button, it automatically sets the order type and disables the drop-down. It remains active until you de-select the button or select a different order type, so you can quickly place multiple orders without having to select the order type.
Adding a TIF button lets you quickly set the time-in-force instead of selecting one from the drop-down.
To add a custom action button:
-
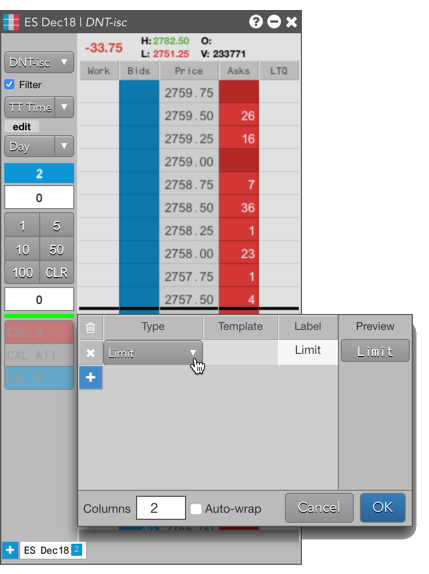
Right-click in the MD Trader Order Entry Panel and select Edit custom action buttons.
The custom action buttons pop-up dialog opens. These settings allow you to add or remove buttons on the MD Trader
widget for commonly used order types, algos and time-in-force (TIF) settings. You can add a maximum of 20 custom
action buttons.
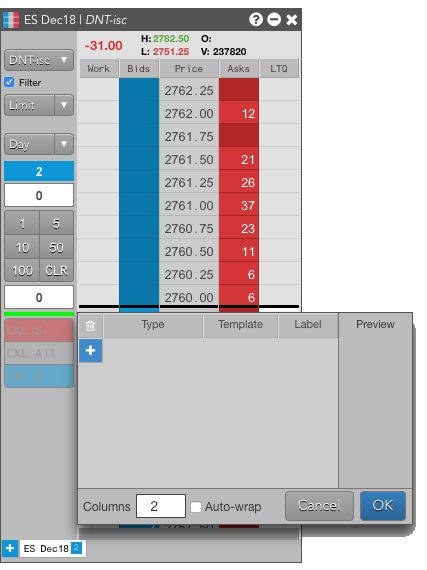
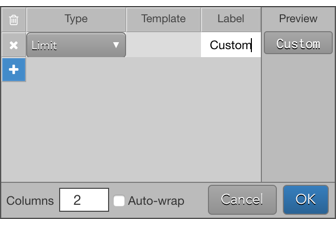
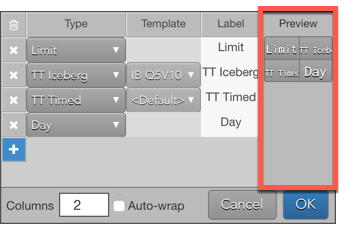
Button Description + Adds a new custom button. X Removes a new custom button. Type Selects the order type or TIF to associate with the button. Template For algos and TT order types, sets the predefined template settings. Label Sets the to display on the button. Preview Shows what the button will look like. Note the width of the Preview column matches the width of the Order Entry Panel when the dialog is opened. Columns Sets the number of columns for custom action buttons. Auto-wrap Sets whether to try to fit the custom action buttons in the specified number of columns. -
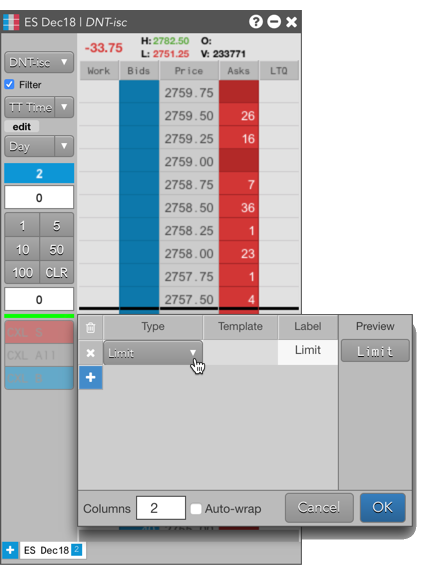
Click “+” and click the drop-down arrow in the Type field to select an order type, algo or TIF.
-
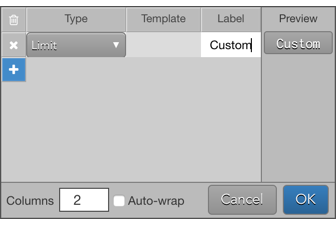
Click the Label field to customize the button name. Check the Preview column to
verify how the title will appear on the button in MD Trader.
-
Click “+” and click the drop-down arrow in the Type field to select an order type or TIF.
- Click the Label field to customize the button name. Check the Preview column
to verify how the title will appear on the button in MD Trader.
-
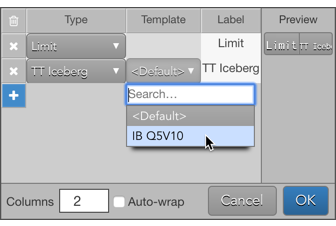
If you have created order templates for a TT Order
Type or custom algo, you can select the template to assign to the button. When the button is clicked, the order
will automatically use the values defined in the template, and will not display the fly-out.
-
You can also define how many columns you want to use to display the buttons in the Order Entry
Panel. For example:
-
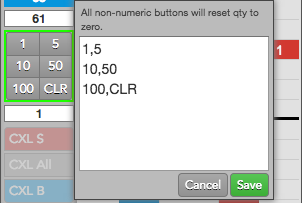
To use two columns, enter 2 (which is also the default). The Preview column
would looks similar to the following.
-
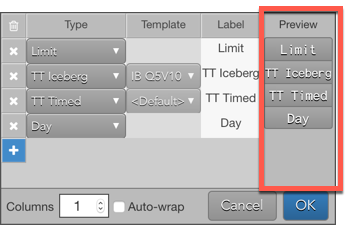
To use one column, enter 1. The Preview column would looks similar to the
following.
-
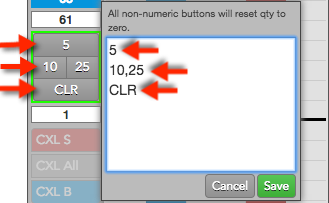
To automatically wrap buttons based on the length of button text across two columns, enter 2,
rename some of the buttons to make the buttons more narrow and then select Auto-wrap. The
Preview column would looks similar to the following.

-
To use two columns, enter 2 (which is also the default). The Preview column
would looks similar to the following.
-
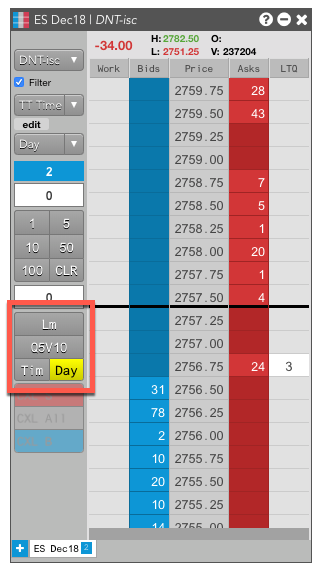
When finished adding and arranging buttons, click OK and Apply.
The custom buttons appear in the MD Trader Order Entry Panel. Click Save to exit settings
and save the changes.
- To save the buttons as defaults for existing or future instances of MD Trader, set Selective defaults in the MD Trader Settings. To use the custom action buttons:
- Left-click on custom action buttons that are assigned to an order type with a template will seed that order type and template parameters, but it will not display the parameter flyout panel.
- Right-click on the buttons will seed the order type with the template and also display the flyout panel.
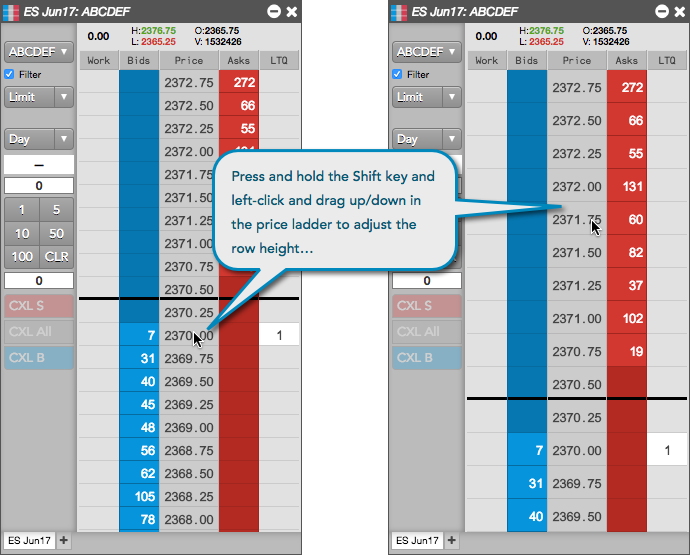
Configuring row height in MD Trader
You can customize the row height in MD Trader by dragging the price ladder column with the left mouse click while holding down the Shift key.
To restore the default row height, right-click in MD Trader to open the Settings menu and click the Reset | Apply buttons.
Customizing order quantity buttons
To customize order quantity buttons:
- While pressing the Ctrl key, right-click in the order quantity number pad buttons. The order quantity button interface opens.
- Change an order quantity in the interface. The value immediately changes on the corresponding number pad button.
- Click Save.
Configuring MD Trader columns
You can choose which columns you want to display from the MD Trader Settings, or you can use the context menu from the column headings. You can also set the bold font and text alignment for each column.
Note: If the widget level bold setting is enabled, the column-level bold option is not available.
To configure the columns you want to show:
-
Click the right-mouse button in the title of a column and select Edit columns from the context
menu.
The available columns dialog appears.
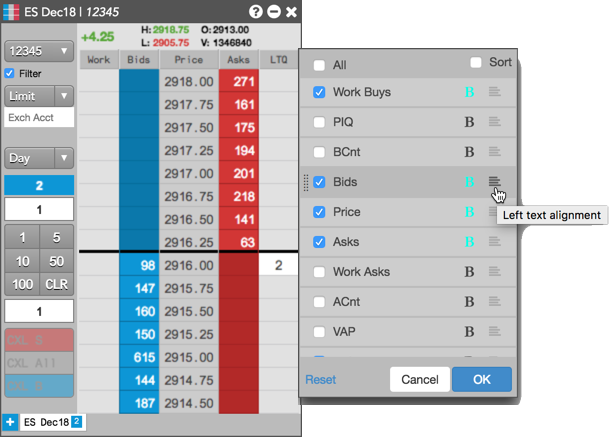
- Select the columns you want to display.
-
To set bold font for a column, click
 next to a column in the context menu.
When bold is active for a column, the button will be highlighted (
next to a column in the context menu.
When bold is active for a column, the button will be highlighted ( ).
).
-
To set the text alignment for a column, click
 to the right of the column
name to cycle through the left, centered, and right text alignment settings. You can also adjust the arrangement of
your columns by clicking and dragging each column name.
to the right of the column
name to cycle through the left, centered, and right text alignment settings. You can also adjust the arrangement of
your columns by clicking and dragging each column name.
- Click OK
Resizing the MD Trader Order Pane
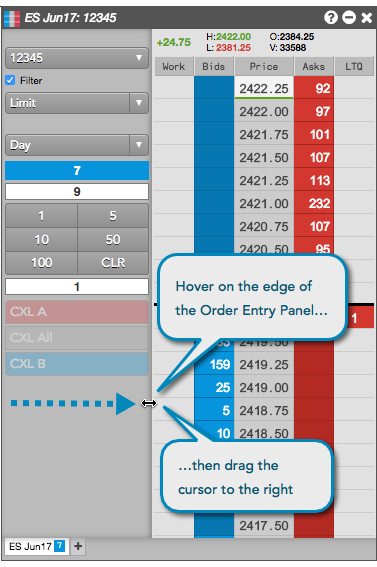
You can resize the Order Entry Panel in MD Trader by dragging the right edge of the panel with a left mouse drag. When you release the left mouse button, the price ladder resizes to accommodate the resized Order Entry Panel.
To restore the default Order Entry Panel width, right-click in MD Trader to open the Settings menu and click the Reset | Apply buttons.
Scrolling the Order Entry Panel in MD Trader
Using the mouse scroll wheel, you can scroll up/down in the MD Trader Order Entry Panel.

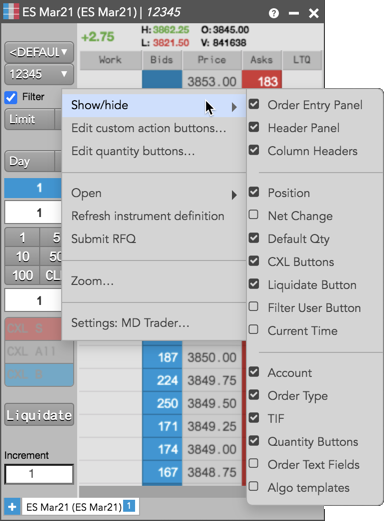
Show/Hide Order Entry Panel buttons and controls
To show/hide the buttons and controls in the MD Trader Order Entry Panel, right-click in the panel and click Show/hide to select a button or control. Check the checkbox next to a button or control to show it, or uncheck to hide it.
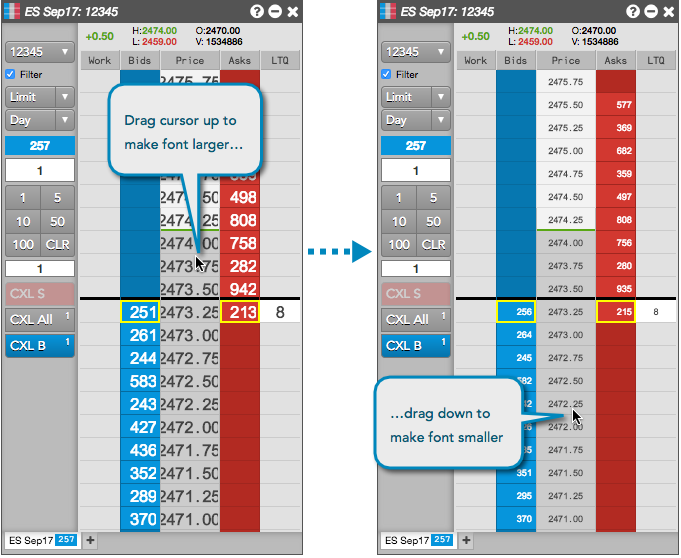
Adjusting font size in MD Trader
To adjust the font size of the MD Trader columns, press and hold the Shift+Ctrl keys while dragging the mouse up or down in the price ladder.
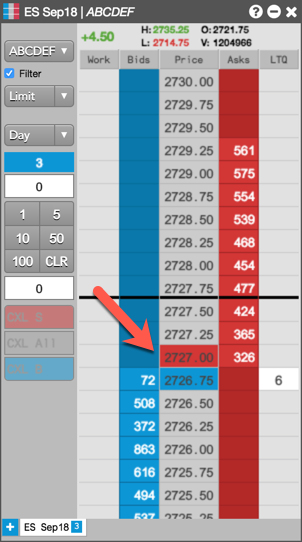
Highlighting the inside market in MD Trader
To highlight the inside market, right-click in MD Trader to select Settings: MD Trader and click the Highlight Inside Market setting. When this setting is checked, the best Bid and Ask price cells in the price column are highlighted based on the color settings for the widget. The default color is red for the best Ask price, and blue for the best Bid.
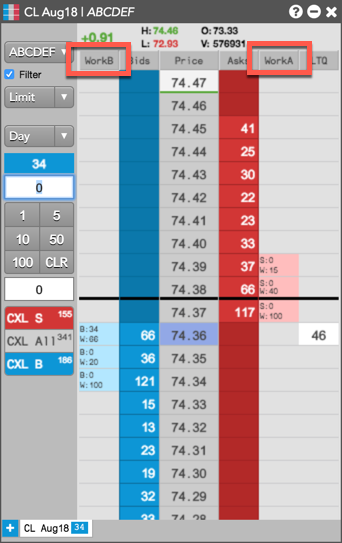
Showing separate working order columns
You can optionally separate the Work column into two separate columns for working Buy and Sell orders. To show the separate columns, right-click on the MD Trader column headers, select Edit columns…, and check the Work Asks column.
When this column is shown, the Work column (that normally displays both working Buy and Sell orders) displays only working bids and its header changes to WorkB. Working Sell orders are displayed separately in the WorkA column.
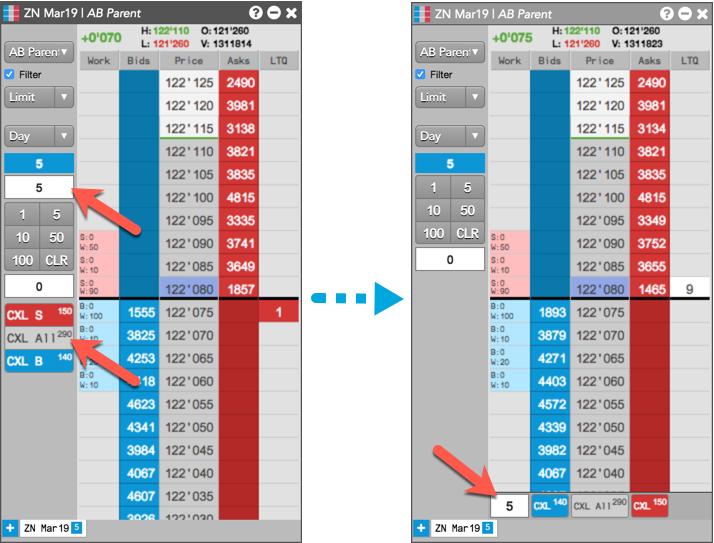
Moving the cancel buttons and order quantity in MD Trader
In MD Trader, you can move the cancel buttons and order quantity field from the side order entry panel to the bottom of the MD Trader grid. You can then hide the side panel to save screen space.
To move the buttons and order quantity, right-click and select Settings: MD Trader… to open the widget settings. In the Display section, scroll down to select the Show order qty and scroll buttons on bottom option and click Save.
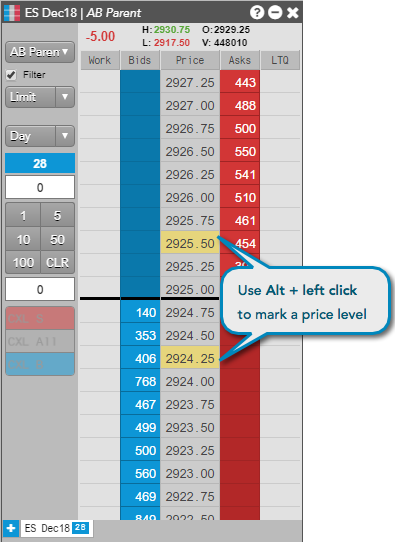
Marking price levels in MD Trader
In the MD Trader price column, you can easily mark specific price cells to indicate levels of technical indicators, support/resistance levels, or reminders of important price points.
To mark a price level, use Alt + left-click on a price cell in the column. To set the color, use the Colors | Background (Marked Price) option in MD Trader Settings. The default color is yellow. Use “Alt + left-click” on a marked price cell to clear it.
Note: Marked prices in the linked MD Trader widget will remain when switching between instruments as long as the widget remains open. Once the MD Trader widget is closed, the marked prices will be removed.